

At CodeCast, we’re excited every time someone makes a Cast. We love seeing others love our software as much as we do. As we’ve watched this community grow, we’ve compiled a list of tips to help our creators on their Casting journey.
Casting not only allows you to create content to help others, but it helps you brand yourself, build your portfolio, and create a network. To ensure you’re having the success you hope for, here are some of the best practices to follow when creating your own Casts.
Our first tip is obviously...use CodeCast! You can add multiple coding directories so your code shares in real-time as you write it, accessible by anyone watching through our Player. It's like a YouTube tutorial and a live code-sharing feature wrapped into a single pretty screen.
So now let's get into exactly what you can do when creating your Casts to make sure they stand out.
Add Media to Every Cast
Often we see Casts where people share large codebases but no media. With no media, there is no connection to the viewer, and since there is no audio or video showcasing what the Caster is doing, it’s often a little confusing to what exactly we’re supposed to be watching.
Ensure you add media to every Cast and do your best to talk through what you’re doing. You don’t have to be a professional teacher by any means. Just share your thought process and explain as you go. Or if you’re me, ramble a lot!
Add a Directory to Every Cast
The ability to share code interactively as you write it is what makes CodeCast special. Add the directory you’re going to write your code in, and each time you save, the code will automatically update inside of the player! This leads us to our next point…
Save
Save, save, save! The design of the Studio means the code gets updated live every time there is a saved change in the directory you’ve added. So if you spend five minutes writing code without saving it, none of that code will be updated! Save as often as you can and at natural breakpoints so the code is updating for the viewer!
Increase Font Size
When we’re sharing our screen, we’re often sharing a view of us working in our code editor. While the font looks good to us locally, the size of the font in the media doesn’t translate the same, especially if you’re Casting off of a very large screen!
We suggest looking at how your media looks in your Casts and being aware that in most cases, increasing the font size in your local editor will help people be able to better see what you’re doing. In Visual Studio Code, increasing the font size is as easy as just hitting Command and + or - !
Change Screen as Needed
Our Studio is flexible, which means that while you’re streaming, you can switch which screen you’re sharing in the Studio without ending the Cast! This is helpful if you need to switch off of a screen while inputting sensitive information, or perhaps you just want to change views!
Change Directories as Needed
Similarly, the directories are just as flexible, if not more so. You have the option to add directories in at any point during the streaming process, regardless of whether you initially included one! Some things you can do include:
- Adding multiple directories
- Removing a directory at any point during the Cast
- Adding a directory (including any you may have created during the Cast) at any point during the Cast
- Add new files within a directory
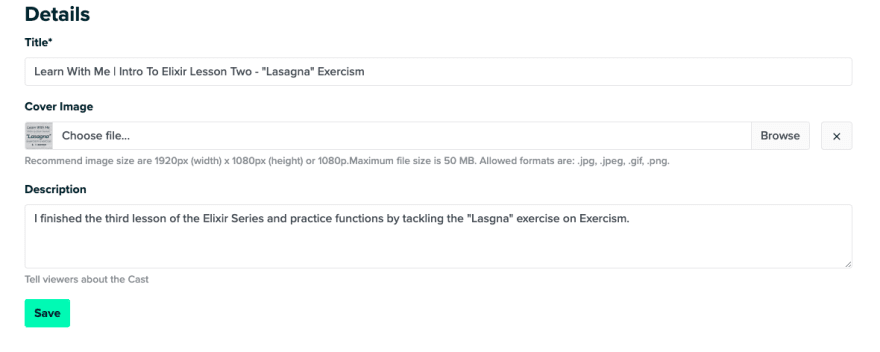
Add info
There are several reasons why providing detailed Casting information is important. Firstly, it helps any potential viewer know exactly what they’ll be watching, increasing their likelihood of clicking on your content! Another is that our homepage is filtered to includes Casts that include all of the following:
- media
- a description
- topics
- a cover photo
After finishing your Cast, navigate to the Cast on your homepage and hit “Edit”. You can fill in all the information there!

Clarify Audience
Clarify the intended audience in the description, or verbally in the Cast. It can be something as simple as “for JavaScript beginners” or “for intermediate Elixir devs”, or it can be as specific as you want. But it will help people quickly understand if they are the suited audience, or if the Cast is perhaps out of their current abilities!
Open the Player
Once you hit “Start Streaming”, you’re provided with a URL and the ability to open the Player in a new window. From here, you can see what you’re doing come to life! It’s a great way to grasp how what you’re doing is translating to the viewer, but is also very important to have open if you’re going to share live Casts!
If you Cast publicly, you can share the URL anywhere you like and anyone can view your live Cast in real-time! The player has a built-in chat function that allows anyone viewing the Cast to chat with you, so try to keep that open to the side to best communicate with your audience!
There are tons of ways you can use the Studio, and everyone will have their own preference! We also have a detailed guide on using both our Studio and our Player to assist you! So take our tips to help guide you as you create your own content. Happy Casting!
Want to see all these tips in action? Check out the first video in the "Intro to Elixir" series by Tam, the founder of CodeCast!
To learn more about CodeCast, check out this video!


%20(1920%20%C3%97%201080%20px).png)